Tuesday, April 10, 2012

Moms are the BEst

 At least my mom is the best. She could write a manual on how to be the best, most awesome, understanding, self-less mom ever. I'm not exaggerating. If you've met my mom you know she's awesome. If you haven't met my mom - you really should. Your life will be better with her in it. I guarantee it.

After the wedding we left for the honeymoon and I haven't spent QT with her since. Last week she came to AZ to spend time with us and it was SO wonderful having her here. Life is better with my mom around.

I love starting projects but sometimes I have a hard time finishing them. Short attention span. I knew my mom would encourage me to finish what I started. Plus she is the best project assistant.

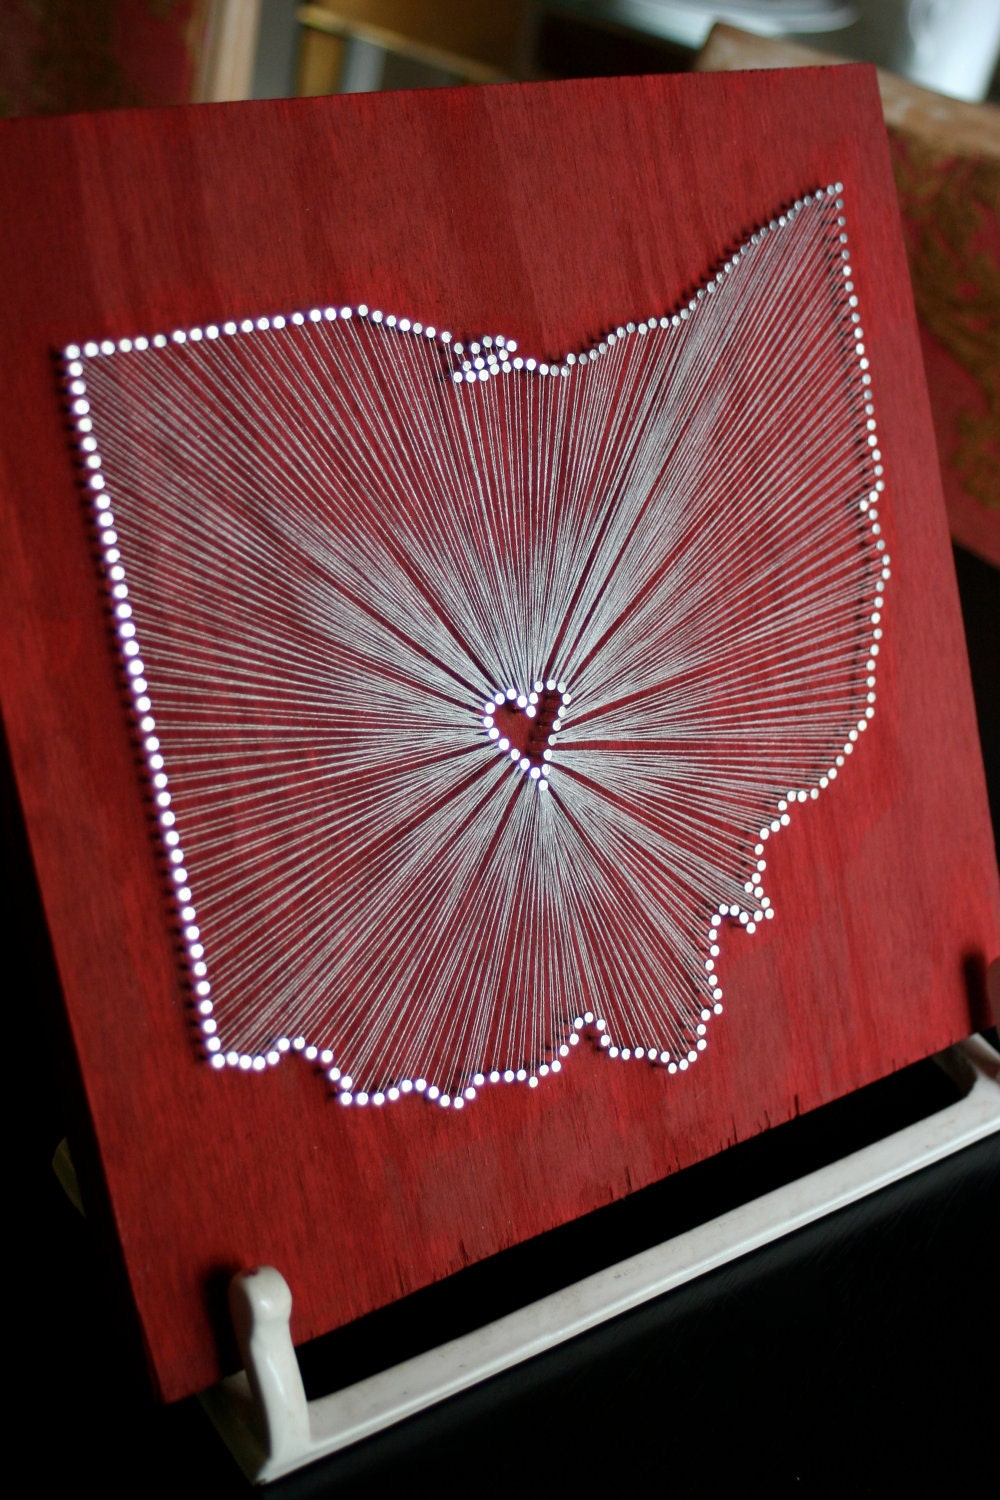
I saw this on Pintrest and loved the idea.


This concept is an original idea made by the very talented Eleanor Mathis who owns the shop Curiously Wrought on Etsy. I saw someone DIY this as a pintrest challenge. So I gave it a try, too. Again, not my original idea. The original art made by Eleanor Mathis is perfect and wonderful and I highly encourage you to check out her shop.

I love these because they say "home is where the heart is." I wanted to make three of these. 24" x 24" each. Oregon, Washington, and Arizona. I want them to go in our entryway. I want them to hang all in a row. With a long floating shelf underneath. So I can put pictures from each of our home cities on it. I also want to put hooks under the self. And a shoe cubby on the floor. And maybe a plant on one side of the shoe cubby. I'm getting sidetracked.

Here is how I did it:
The picture in the middle is a quick sketch of the end plan for the project. 

For this project you will need
- 3 wooden boards (any size you like).
- String
- Paint (for the board and nails - optional)
-Paint brushes
- In this picture you see tacks but I ended up using nails that I got at HomeDepot
- Hammer
- Ruler
- Pen/Pencil/Marker/Crayon
Lay out plastic and start painting. I wanted the paint to have some depth so first I put down a cream color nice and heavy. 

I used a blow dryer to speed up the drying process. 

Then I added a honey-brown color. 

I left it patchy on purpose so the reds would show up lighter over the cream and darker over the brown.
Adding in the reds. 

The finished paint job. Now let them dry.

I had outlines of the states enlarged at FedEx/Kinkos.

I taped the outlines onto the board. 

I wanted all the nails 1cm apart so I took the ruler and marked 1cm intervals around each state.

My mom hammering in the nails. We used two books to to keep the lines straight. 

My mom did most of the hammering for this project. She was determined!

All in a row. 

So along with hammering nails around the outline, you have to hammer in nails for the heart. Go to power point, choose a heart, set the outline to dashed and bump it up to 8 pt or more. This will give you a good basic guide.

I wanted the nails to be bronze. So while the paper was still on the board I spray painted the nails. 

Peel off the paper. 

The big reveal! Now start wrapping the yarn.

To figure out how many border nails get wrapped to a heart nail, divide the number of nails around the border by the number of nails in the heart. This will give you a guideline. However I find it is more important, aesthetically, to make sure there is some kind of symmetry around the heart. 

At first there was one...

Then there were two...

And then there were three (finally)!

As I mentioned before... totally could not have done this without help from my mom (thanks, mom!) and of course the brilliant idea from the original artist, Eleanor Mathis. Mine are no where near as wonderful and perfect as hers, but they will do. Especially since we are on a decorating budget. I made all three for less than $50.00.

I like having DIY art around the house. These will always remind me of the wonderful time I had with my mom when she came to visit us in our very first home.

Wednesday, April 4, 2012

Wedding Projects - The Mendhi NIght Tent (Part 3 of 3)


Quick Recap of Part 1 and Part 2

Before:

And....VIOLA! (after, obviously)
Break down of all the layers:


Cutting the PVC and mixing the concrete will require additional items. When you go to buy these items at your local store ask someone to show you the tool options for cutting PVC and you can pick the one that is right for your budget and general use. Also, we can't remember the type of concrete we used but it was a standard pre-mix variety from Home Depot.

Umbrella Stands

Decide on how many umbrella stands you want to make. For each stand you will need:
1) Large Golf Umbrella - make sure the handle is NOT the hook type.
2) PVC pipe 3" diameter (This is going to be the long pipe that gives the umbrella height)
3) PVC Pipe 2.5" diameter (This is going to be about one-third the length of the 3" diameter pipe)
4) 5 gallon bucket
5) Concrete mix

To decorate the stand you'll need:
1) Lengths of fabric to cover the poles
2) Spray paint (for the umbrella and for the lanterns (optional)
3) Lanterns - 3 per umbrella. I used the Ikea ones .
4) Foam poster board - 1 per umbrella. These are used to hide the stretchers (see pic below).
5) Glitter glue tubes, Arcrylic paints, or whatever you want to use to jazz up the foam board.
6) Tape
7) Fishing line
8) Safety Pins

These umbrella stands have the basic anatomy of any standard patio umbrella and stand.

Here is the anatomy of an umbrella:


Let's say I want to make one umbrella stand, with a finished height of six feet.
1) Open your umbrella and measure the distance from the top of the ferrule to the runner. Also measure the distance from the runner to the end of the handle. Note both measurements.
2) The 2.5" diameter PVC pipe needs to be about 1/3 the total height of the umbrella. If I want my total height to be 6', I would cut the 2.5" diameter pipe to a length of 24".
3) Get your 5 gallon bucket, 2" diameter pipe, and concrete mix. Carefully read the directions on the concrete mix and prepare it.
4) Have someone hold the bucket in place, have another person firmly hold the 2" diameter PVC pipe in the center of the bucket. Have a third person pour in the concrete. Hold the pipe in place until the concrete sets enough to let it go. Let it fully dry. Use a dolly to move the bucket one it's dry - these can get heavy, safety first! The reason you don't affix a 6' pole into the concrete bucket is to make them more portable.
5) Once the concrete is dry follow this formula to find the length of your 3" diameter pole. Then cut it to that length.

72" - x" - y" = length (of 3" diameter pole) in inches
where
x = distance (in inches) from the bottom of the bucket to top of dried concrete
y = distance from the top of the ferrule to the runner

Lets say x = 20" and y = 18 " --> 72" - 20" - 18" = 34". My 3" diameter PVC pipe will need to be 34" long. If you don't need your stands to be an exact height measure everything first and then adjust to make the most of your materials.

While the concrete dries:
1) Spray paint your umbrella. Inside, outside, underneath - everything above the runner. You don't need to spray paint the pole because it's going to get covered up.
2) Spray paint your lanterns (optional). The ikea lanterns are all silver and I wanted a more regal look. Each of my umbrella stands got one silver lantern, one bronze lantern and one gold lantern. You can hang anything from the umbrella as long as it's not too heavy. We chose the lanterns because we had enough of them laying around the house from another event.
Inside the umbrella. 
3) Make the foam board circle to side the umbrella stretchers. Here is how:
- Hang the lanterns as far out as possible on the umbrellas
- Measure the diameter of the stretchers and draw a circle with that diameter onto your foam board. Try to find something circular around the house that has the diameter you need. My mom happened to have an extra-large stainless steel mixing bowl that worked well for us.
- In the center of the foam board cut a hole just barely large enough for the handle of the umbrella to squeeze through. The smaller you can make it the better.
- Decide on a front side and a back side. Decorate the front as you please. We used purple glitter glue to make simple designs on the foam board. All of our foam boards had identical designs.
4) Cut your fabric long enough to cover the PVC pole and bucket. We used two types of fabric to cover the poles. The base was either a fuchsia or turquoise satin and we used a fuchsia or turquoise net that had a gold accent as the overlay. To make the most of our fabric, we cut our 60" wide fabrics in half. In the above and left pictures only the net is on the pole but in the finished product picture you'll see both the fabrics.

Now you have everything you need and you just have to assemble it!
1. Place your bucket in its place
2. Slide the 3" diameter pole onto the 2.5" diameter pole.
3. Place the foam board (with the design down) on the pole.
4. Slide the umbrella through the foam board into the PVC pipe.
5. Tuck 6" of your fabric into the Pipe
6. Pin the fabric closed so it doesn't gape.
7. Hang the lanterns on the stretchers with fish line. Balance them around the umbrella so they are stable.

And the tent is complete! Sit back on one of the thrones and admire your completed work!


Friday, March 23, 2012

Wedding Projects - The Mendhi Night Tent (Part 2 of 3)

Quick Recap of yesterday's post (Part 1)

Before:

And....VIOLA! (after, obviously)
Break down of all the layers:

Yesterday I covered 
1) Swagging the ceiling
2) Marble backdrop
3) Mughal windows

Yesterday I said I would go over the the umbrella stands. I lied. I'll go over those in Part 3 (best for last). Today I'll talk about the benches, the bolster pillows, reflective pools, and pedestals. 

Here goes:

5) The Benches: These benches were originally built to make wide risers for a temple project. After that project no longer required the benches my parents and their friends each took one and they became cots in our homes. When we were in the planning phases I thought we would just have floor cushions under the umbrella stands. My dad recommended that we use the cot in our home for me to sit on so that it makes a stage like setting. We already planned to give my seating area extra attention with three umbrella stands. I felt that triple umbrellas plus the bench would put too much attention on the center and would throw off the proportions in the tent. When I told my dad this he said (imagine an Indian accent for me) "no problem, beta! I can get you more benches!" And get more benches he did. The weekend before the event my dad's friends trucked over the benches. It worked out perfectly that the cots were originally made as risers because we were able to use the tallest cot as the center bench and then step the heights down away from the center (you can kind of see in the picture). The risers lead the eye nicely to the center bench. 

We wanted to cover the benches with something soft so they would be comfortable to sit on, but cuts of foam were pricey. 

Almost everyone in my parent's friend circle owns a hotel. Hotels have thick bedspreads. When these bedspreads get worn they have to be removed and replaced, but we keep the old ones around. We happened to have lots of these nearly perfect bedspreads on hand. The bedspreads are printed on one side and white on the other. We folded them inside out and into fourths. Laid them on top of each cot. Done. Next, we cover the cots with a large satin table cloth (all of the linens are from LinenTablecloths they have the best deals). From the underside, diaper pin the satin to the bedspreads so the satin doesn't slide around. Now the cots are covered and ready for some bolster pillows. 

6) Bolster Pillows: In full disclosure, my grandma came up with this genius idea. To make the bolster pillows we folded the bedspreads inside out and into fourths, then rolled them up. To keep them from unrolling we used clear packing tape. Pillow complete! 

Next step, covering the bolster pillows. We needed a way to cover them that was fast and easy. I mentioned in my last post that everything in the tent was prop quality. The pillows didn't need to last more than a few hours and sewing would require more time than we were willing to spend. So via my mom and aunt another brilliant idea was born. My mom called over all of her friends one day and we got to work.

1) cut fabric so that it can fully cover the bolster
2) roll up the bolster in the fabric hot dog style. Using clear packing tape, tape the long seam. Leave the ends hanging open.  
3) For the ends we had to do a bit more work to give the pillow a nice puckered look. We used needle and thread to make big stitches around the open edges and then pulled the thread tight to gather the fabric in the center. Make a knot to hold the pucker in place.

We formed an assembly line and before we knew it, ta-da! Pillows were complete! Except they looked plain just covered in solid satin. The pillows needed pizzaz! I found gold ribbon at costco nice and cheap. I also cleaned out rhinestones from Michael's. Although I had these items I wasn't quite sure how to use them yet. Then a friend of mine came up with the great idea of criss-crossing the ribbon and hot gluing rhinestones on the cross sections. It was easy and we got to work!

Here you can see the criss-cross patten and the pucker. 
7) Reflective Pools: These were simple to make (and I'm sure you can see why!). Gather kiddie pools. You know, the cheap kind you get for like $7.00. Well, they are really hard to find in the PNW - especially in the winter time. Good news, you can find these in AZ year-round. So, I just had the hubby fly a couple out with him (yay for Southwest allowing 2 free checked items!). We spray painted them gold inside and out. Then to cover the sea horses on the bottom we used a square of teal fabric and then weighed it down with a bunch of Dollar Store water gems. Next, fill the pool up with water and sprinkle with rose petals and floating candles. 
So pretty!
8) Pedestals: These are Ikea Lack tables that were in my old apartment and in my brother's bedroom. We covered them in gold square linens and my meticulous aunts nicely folded and pinned them into place. On each table we put a candle, some mendhi cones, some mendhi design books - all nicely sprinkled with rose petals.


So that's it for Part 2! See you all back Monday for the final installation of the tent saga :)

Thursday, March 22, 2012

Wedding Projects - The Mendhi Night Tent (Part 1 of 3)

When I first started planning our wedding, I thought we would hold the mendhi night inside our home and not fuss over trying to decorate.

What I actually ended up with was one of the most elaborate DIY projects of my LIFE. I decided I wanted a Mughal-ish theme and ran with it.

The tent that made the beautiful setting for my mendhi night was a DIY project on steroids. It was a culmination of many months of planning and would not have been possible without help from SO many wonderful people. Because everyone put so much effort into decorating this tent I feel compelled to share it's making with the world.

Here is what the empty, clear-top tent looked like:


And....VIOLA!
The Beautiful Finished Product (should've ironed that teal sheet in the center!)
I chose a clear top tent so we could see the stars during the event (and white tarp overhead would have been really unsightly). Unfortunately, with the heaters running and about 250 people inside, the condensation on the tent  made it impossible to see outside. This is just half of the tent. The tent was double what you see here.
Here is the 'dining' side of the tent
The tables were draped with a large fuchsia table cloth, a gold square (laid on the diagonal) and a teal table runner.
The centerpieces comprised of a large vase filled 1/5 of the way with blue beads. We put a tea-light on top of the beads and a peacock feather wreath around each vase. 
Okay, back to the main part of the tent. Here is a break down of all the layers:

The pictures and directions that follow are going to seem unclear at times. When we were making everything I had no clue I would be putting together this blog and showcasing our work. If you have questions or need clarifications feel free to email me. 
The decor was meant to function for only a few hours so it was similar to prop quality. No one that helped in the planning. design. or making of this tent was a professional - we're just a bunch of creative types who went nuts. 


My friend's dad securing the fabric to it's high point

1) The Ceiling Swag: I bought all the fabric bulk from CV Linens. In order to make the swags we measured the cross beams of the tent that we were covering, decided on how low we wanted the swag to hang and cut the fabric accordingly. We gathered all five panels at one end and tightly zip tied them together. This clump of fabric was then attached to the central high point. Each panel of fabric was pulled to it's respective section of the corner and zip tied to the tent frame. To get the swag right we just had to play with the fabric before we zip tied it down.

This was actually the last step we completed because swagging the ceiling was a last minute decision. I decided to add the ceiling swags because it brought the eye up and added much needed color up high. We did this in all four corners and it made a huge difference to the feel of the tent.  Even though it was late, my uncles and my dad's friends were all there ready to help get the swagging up. The wedding really made me realize how blessed I am to have such a supportive group of family and friends!

2) Marble Effect Backdrop: The final effect we achieved was partially intentional, partially accidental. I ordered bolts and bolts of gold fabric from India to function as the backdrop for the tent. When the fabric came it was a pastel yellow (that's what I get for ordering from India). Pastel yellow as the backdrop would have taken the mood in the tent from 'sultry Bombay night' to 'baby shower' in no time. So, I invited over my trustee bridesmaids, loaded up on gold spray paint and we went to work.
1) Cut the bolts of fabric into enough panels to cover all the walls of the tent. Cut the panels 3-6"shorter than full length to prevent them from soaking water up into the tent (if you're dealing with rain).
2) Hem the top and bottom of each panel to give a clean look and prevent fraying. We hemmed the top of the panels like curtains to make hanging them easier. We didn't have to hem the side edges because we kept the width of the fabric as the width of the panel.
3) Spray paint the panels gold. Some may think I am crazy to spray paint so much fabric gold - you're right, I am crazy. Initially I wanted a flat gold look but the marbled effect added depth and dimension to the tent. What I am saying is, the baby shower yellow worked out to my advantage. We got (pastel) lemons and we made lemonade.
My dad and his friends stringing up the backdrop and
arranging the over-sized wooden benches. 
4) Hang the panels all around the tent. We used fishing line to hang the panels because it's cheap, strong and lightweight. My dad and his friends would string the panels onto the fishing line, pull the curtain taunt, and then secure the fishing line to the tent frame with a zip-tie.
5) After all of the panels were up my cousins went through and pinned all the panels together along the vertical edges. This kept them from gaping and flying up every time a gust of wind blew through the tent.


3) Mughal Style Windows: This is something I said I wanted and a good family friend took it upon himself to make it happen. Making these babies took patience. This project requires 1" thick pink insulation foam board, soldering tools, sandpaper and black paint.
1) Decide on the design of the window.
2) In order to get our design to the right size we used a projector. Hook up your laptop and projector and project your window design onto the foam board. Carefully trace the design onto the foam board. While you trace the design let your soldering tools heat up.
3) We used a blade like attachment to cut through the foam. The heated soldering tool should slide through the foam like butter. If you have never done foam carving before I recommend practicing first. Another way to do this is to set up a hot wire station in your garage or shed. We used to have a hot wire station in our garage and it made foam carving much easier. For the tent we carved about 20 windows.
4) Once you finish with the soldering tool you'll have to go in with ultra fine sand paper to give the windows a uniform finished look. The shape I chose had a lot of little crevices that needed sanding. I also liked a rounded look around the edges so that took time as well.
4) Paint them black. I wish I could have spray painted these windows but spray paint + foam = no good. Spray paint eats away at the foam. You might be tempted to use latex paint because it comes by the gallon but latex is too sticky and takes too long to dry on the foam. Acrylic paint is the way to go. It's cheap and it dries quickly without a tacky finish. The sanded portions can be hard to paint because they are a a bit porous and the pink shows through easily. Instead of trying to paint the edges we used black duct tape all around the windows and it worked out really well. It gave each window a nice polished look.
5) As the finishing touch I sprayed silver glitter over all the windows. Again, you can't use anything that is aerosol based. I was able to find a non-aerosol glitter spray at Micheal's.


Because there are so many layers to this tent I'm breaking it into a three part post. This is it for Part 1 of the Mendhi Night Tent. To those of you who put your blood, sweat and tears into this tent (you know who you are!), THANK YOU! See you back here tomorrow for Part 2: Making of the umbrella stands.

Sunday, March 18, 2012

The First Memories

Warning: This is a post about Christmas in March. Better late than never, right?

The first few months in our house were a whirlwind. We were so busy with the wedding and I was back and forth from Portland so we did the bare minimum to make the house livable. We bought a couch and dining table and left everything else empty. When we returned from our honeymoon the house had been ours for 3 months and it was, for the most part, a big empty box. Lucky for us B(S^3) planned a road trip to spend Christmas with us! I LOVE Christmas and wanted our first Christmas to feel festive. More importantly I wanted it to be special for the little ones. Also important- I did not want to break the bank on Christmas decor. So, we had 10 days to get ready for Christmas - with some smart shopping and a lot of love we pulled it off.

The focal point (and most important) of all Christmas decor is the tree. I am the type of person who likes all of my Christmas decor to be themed and/or color coordinated. For our first Christmas I felt traditional colors were appropriate (yes, in my dream world every year the colors and themes would be different). As much as I love Christmas I am not a living tree kind of gal (messy, bugs, expensive over time etc.) and unfortunately a fake tree that doesn't look cheap can be expensive. The ideal fake tree, in my opinion, is about 9 ft tall, full, with a hefty circumference... which means a hefty pricetag ($300 or more!). No way was I willing to spend that much on a tree, so I decided to do my best to imitate the things I liked about my ideal Christmas tree:

1) 9 ft tall
2) Not skinny looking
3) Full look (no sparse looking branches)
4) Under $75 (tall order, I know!)

We have a Big Lots nearby and I happen to find a tree there that was only $70.00 (woohoo!) so that fulfilled #4 on my ideal tree requirement list. I wish I had taken a picture of the tree on display at Big Lots - 'sorry looking' would have been a nice way of describing it - but after inspecting it I knew it had potential. It was only 7ft tall but with a few adjustments I knew it could be glorious! Once we got the tree home I set it up and started to fluff the branches open. I put the tree in the corner so that one side could be kind of ugly and it wouldn't matter. I arranged the branches so that from three, out of four, sides the tree looked nice and full. The only remaining thing on my ideal tree list was #1... I wanted the tree to be 9 ft tall. If the ceilings in our home were 8 ft, a 7 ft tree would have been just fine. But with 10 ft ceilings a 7 ft tree looks a little bit sad. So, I gave our little 7 ft tree a nice 1.5 ft platform made out of moving boxes that we had lying around. Add a 6 inch star to that and we had, what nicely imitated, a 9 ft tree! I bought all the ornaments and the star from  Big Lots ($45.00) and the ribbon 70% off at Jo-ann's ($10.00). 


Like I mentioned earlier, in my dream world my Christmas decor would change every year. Instead of buying themed wreathes I bought plain ones and decorated them with ribbon that matched the tree (also bought at Jo-ann's 70%). This way I can just change the ribbon for a new look every year. I framed the windows with ribbon and hung wreaths over each panel. 


Over sized stockings are the best. They look great but buying them ready made can be expensive. I only had a few days to make these stockings so they aren't high quality. Using felt I made all six stockings (and the tree stand cover) for less than $7.00. I won't be using these stockings again so expect an update closer to Christmas 2012 on stockings that are homemade and high quality. 


I wanted a festive centerpiece, but again, I wanted to spend as little as possible.  I had seen the concept of using mini ornaments and cylinders in a few places.  liked that it was simple to do but I wanted my version to have candles as well. 
Here is what I used:
- Mini ornament tubes - $1.00 each  at Target
- Red ball shaped candles - $3.00 each at Target.
- Candle stick holders - $1.00 each at the Dollar Tree
- Three cylinder vases - $12.99 for the set from Ikea
- Card board ribbon spool (left over from other decor)
The candle stick holders and vases were items around the house that weren't being used so I only had to buy the mini ornaments and candles. 
1) The tallest vase: fill with mini ornaments and put candle stick holder upside down on top of the cylinder. The cylinder is just the right size to hold the candle stick holder. Since this candle is exposed using the candle stick holder upside down provides a better base for the candle. 
2) The medium height vase:  I wrapped ribbon around the empty spool (to hide the ugly cardboard), then put the candle stick holder (right side up) on top of the spool (I did this so that the candle would sit at the right height). . Fill the cylinder with the ornaments and then top with the candle. 
3)The shortest vase: put the candle stick holder in right side up on the bottom of the cylinder, fill with ornaments and top with candle. 

We put up lights outside of the house and got Reindeer for our lawn.


 I put a large red bow and an over-sized ornament under our carriage lights. These were to make the house look festive during day light.
  And it's not Christmas without a wreath on the door. Unfortunately I didn't have time to decorate this wreath with more than a red bow... Always room for improvement next year :)


All of the decor aside, Christmas isn't Christmas without family.